Nailing the Exposure
This guide is mostly about the creative aspects of photography. But to be creative, you need a solid grasp of basic camera settings so that your camera does what you need it to do. We'll begin with the settings that control exposure. If you're already familiar with aperture and ISO, you can skip this section of the guide. But if you have been relying on your camera to set the exposure automatically, please read on.
The Sensor
Camera sensors have improved considerably in recent years; however, they are still much less sensitive than the human retina. You will often run into sensor limitations when photographing scenes that look fine to your eye. Dark parts of the scene may fall below the sensor’s lower limit and be recorded as pure black, with none of the detail your eye can perceive. Conversely, bright parts of a scene may exceed the upper limit of the sensor and be recorded as pure white, again with no detail. This over- and under-exposure is referred to as clipping, and your job as a photographer is to avoid it by carefully controlling the amount of light that reaches the sensor.
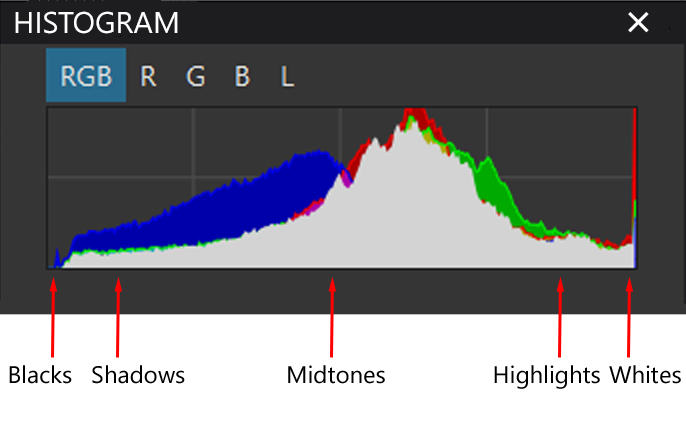
To guide your exposure decisions, your camera has a light meter that measures and displays the amount of incoming light. This coarse-level feedback is generally sufficient for setting the exposure. Many cameras will also highlight over-exposed areas of an image by blinking them on and off (this is an option that has to be turned on using the camera's menu). For additional feedback, you can view a histogram of test photos (see the adjacent figure).
Modern cameras provide a variety of metering options. Having the camera analyze the entire scene is best approach in most cases and should be used as your default choice (this is called "evaluative" or "matrix" metering, depending on the camera; see your manual).
There are three controls that work together to determine the exposure: shutter speed, aperture, and ISO. We will examine each in turn, with consideration of the inherent trade-offs that need to be considered.

A histogram displays the distribution of brightness levels within a given image. The far left of the graph shows the proportion of pixels that have a value of zero, meaning pure black. The far right shows the proportion of pixels that are pure white. In the example histogram, there is a peak at the far right, indicating that part of the image is overexposed (clipped). There are no pixels at the far left, so under-exposure is not a concern in this example.
Shutter Speed
The longer the shutter remains open, the more light will reach the sensor. Therefore, one way to deal with low-light situations is to select a long shutter speed. The trade-off is that the longer the shutter is open, the greater the potential for subject movement, resulting in a blurry image. To freeze action, the shutter has to open and close so rapidly that the subject's movements are imperceptible. For example, a shutter speed of 1/2000th of a second or faster is typically needed to freeze a bird in flight. Such a fast shutter speed seriously limits the amount of light that reaches the sensor, which is why action shots are hard to pull off under poor lighting.
Aperture
Like the pupil in your eye, camera lenses have an adjustable diaphragm that determines the amount of light that is allowed to pass to the sensor. Under low light conditions, you can increase the size of the aperture to collect more light, but again, there are trade-offs. Increasing the aperture reduces the depth of field of an image (i.e., how much of the image in front of and behind the subject is in focus). We'll discuss depth of field in the section about image sharpness.
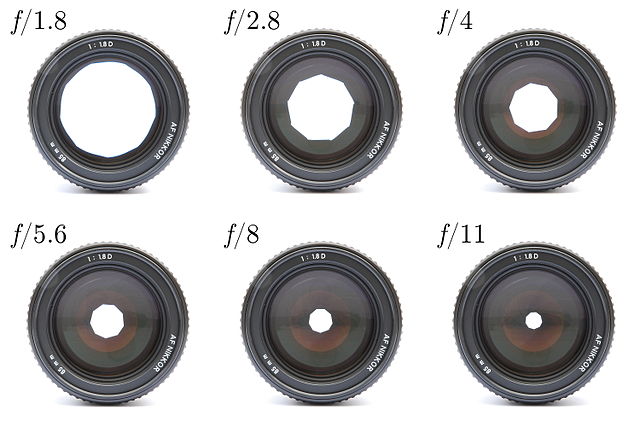
Cameras refer to aperture size in terms of f-stop numbers. Thanks to the formula used to calculate f-stops, this value increases as the opening size decreases (see the accompanying figure). Opening the aperture by one full stop doubles the amount of light that reaches the sensor.

ISO
In the days of film cameras, ISO was used to express how sensitive a given type of film was to light. This concept was carried over to digital cameras, though digital ISO can be adjusted across a much wider range.
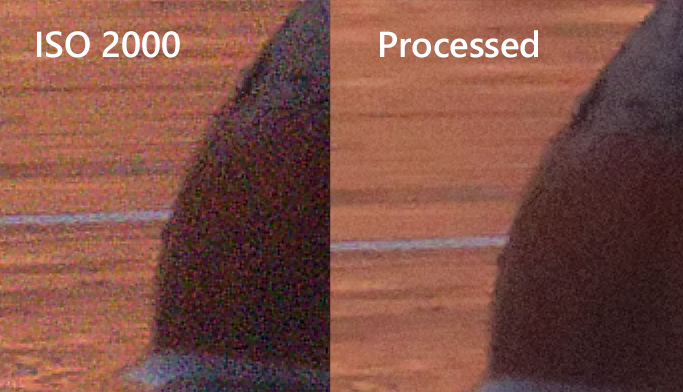
ISO does not change the sensitivity of the sensor itself — its physical properties are fixed. Instead, increasing the ISO boosts whatever signal the sensor has recorded. This provides another approach for achieving a proper exposure when lighting is inadequate. But, you guessed it, there are tradeoffs. Under low light conditions, when few photons are hitting the sensor, there is a lot of uncertainty about the color and intensity of the incoming light. This uncertainty is revealed in the form of “noise” when the signal is boosted via ISO (see the example photo). Noise is most evident in the darker parts of the image, where uncertainty is greatest.
The upshot is that photo quality is best at the sensor’s base ISO. However, noise is usually not apparent unless the image is magnified and the ISO is above roughly 500 (depending on the camera). Furthermore, new AI-based tools can remove much of the noise in post processing, even at fairly high ISO levels. When poor light forces you to choose between a high ISO (and noise) and long shutter speed (and motion blur), high ISO is usually the better option.

Putting It All Together
Shutter speed, aperture, and ISO are used in combination to obtain a properly exposed image. Shutter speed and aperture have additional photographic roles that often take priority over exposure for creative reasons (we'll discuss these in the next section). Therefore, nature photographers typically rely on ISO to provide much of the flexibility needed for achieving a properly exposed image. This is done by setting the shutter and aperture manually and allowing the camera to set the ISO automatically. This approach works well, though it is important to keep an eye on the ISO being used. If it becomes high enough to affect image quality, it may be necessary to make manual changes to the shutter speed and/or aperture.
You cannot rely on your camera’s metering system to always achieve the correct exposure. The overall image may be adequately exposed, but your subject may not. A common problem is overexposure of white patches on birds. Alternatively, bright white scenes, like snow, may end up looking gray. Therefore, it's good practice to look at the histogram of a few test photos to ensure that the overall exposure is correct. Also, review the photos on your camera's LCD screen, with the "blinkies" turned on, to identify localized problems. With this information you can fine-tune the exposure as needed.
To override the camera’s automatic exposure settings when using auto-ISO you will need to apply exposure compensation. Doing so forces the camera to overexpose or underexpose by a set amount relative to what it thinks the correct exposure should be. See your camera’s manual to determine how to set exposure compensation on your camera. Alternatively, you can set your camera to full manual mode and dial in the exact settings you want.
