Build a Listening Lid

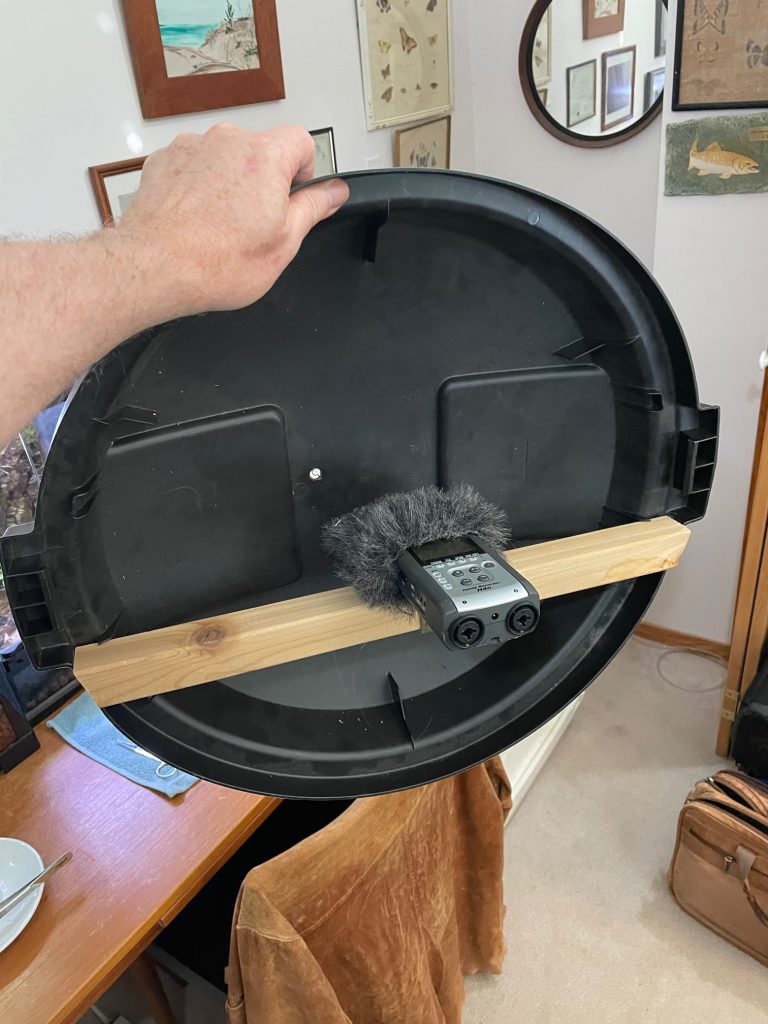
A Listening Lid built from a Zoom recorder, a trash can lid, and a microphone windscreen. Photo Credit: John Acorn
Take a moment and listen to the world around you. What can you hear? We humans have pretty weak ears compared to dogs and other animals. Lots of sounds are too quiet for us to hear. But in this activity, you’ll make your own Listening Lid that will help you capture all the incredible sounds of nature! A special thank you to John Acorn, Nature Alberta’s Patron, for designing this activity.
Safety Warning
Shiny bowls/lids will focus light as well as sound, which can make your Listening Lid's focal point become dangerously hot. We recommend that you avoid using stainless steel or other metals for this activity.
What you need
- Sound recorder with a fuzzy or foam windscreen
- The brands Zoom, Tascam, and Sony work best (i.e. any recorder that’s small and comes with a built-in microphone). But a cell phone with a voice recording app will work in a pinch.
- Large bowl or lid
- Trash can lids seem to work the best
- Optional:
- Drill
- Wood support
- Bracket
- Tripod Screw (i.e. a bolt with 1/4”/20 threads)
- Headphones
- Tissue or cotton ball
What to do
- Collect your materials and go outside.
- Place the recorder next to the lid or inside the bowl.
- Move the recorder around in the lid/bowl to find the best position for it to pick up the most sounds. Hint: The curved lid/bowl helps direct sound towards a ‘focal point’, which is usually at the center of the bowl. To get the best sound, try placing the recorder so the microphone faces this focal point.
- Try to be very gentle when you move the recorder because the sound of your hands near the microphone might drown out some of the nature sounds you’re trying to collect. Or as scientists like to say: the handling noise you create might make it hard to get a ‘clean’ recording.
- Listen to all the sounds around you! Point your Listening Lid towards a patch of trees to see if you can pick up sounds from birds, bugs, and other creatures. If you live near a pond or lake, try pointing the Listening Lid towards the reeds, and then water. What new sounds do you hear? Get low to the ground or point it to the sky. How many more places can you tune in to?
Optional: Make a permanent listening lid
We don’t recommend you do this with your mom’s favorite salad bowl, but if you’d like to make a permanent Listening Lid, here are the steps:
- Attach the wood support to the lid or bowl so it makes a shelf for the recorder to sit on.
- Attach the recorder to the wooden bar using a bracket and a “tripod screw” (i.e. a bolt with 1/4”/20 threads)
- Drill a hole in the lid or bowl to make a headphone slot. Slide the headphones through the hole.
- To help keep the headphones from rubbing against the lid or bowl and making additional noise, add something to the hole to pad it. Things like a stretched-out cotton ball or a tissue work well.
More things to try!
- How do the recordings sound different in the winter vs. the spring?
- Hint: think about what animals are present during different times of the year and what they are doing. Breeding season sounds a lot different than any other time of year for many creatures.
- What materials work best for the lid (ex. glass, plastic, cloth)? Why do you think this is?
- If you don’t have a natural area nearby, grab a couple of friends and try this out instead!
- Have two people walk about 50 meters away, and talk in a quiet voice with each other. See if you can ‘hear’ their conversations using the Listening Lid.
If you loved this activity, you might enjoy learning about bioacoustics. With an adult’s permission, use a computer to find out more about this fascinating science!
