Make a Snow Fort
If you’ve ever taken a tumble while tobogganing, you know that snow is COLD! So why do some animals, like mice and voles, shelter underneath the snow during the winter?
Actually, snow is a great insulator. As each new snowflake gets added to a snow pile, it traps some air. Kind of like the air gaps inside your big puffy winter coat. And because these air gaps usually stay warmer than the outside temperature (around 00C), it’s the perfect place for animals to wait out the freezing winter. And if animals bury deep enough, the warmth from the earth can also help keep them nice and cozy all winter long.
Test this out for yourself by building your own snow fort!
Be Careful:
Never build a snow fort alone or without adult supervision. If your snow fort accidentally collapses, it’s important to have someone else there help dig you out. Never make a snow fort using unclean or discolored (ex. yellow or brown) snow.
Option 1: Make an Quinzee
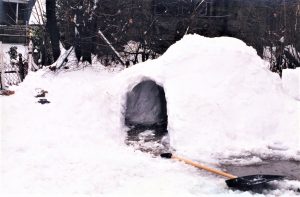
A quinzee is a type of snow shelter made right out of a snow bank.
Materials
- Snow bank (at least 5 ft of deep snow)
- A shovel
Steps
- With your shovel, start digging into the side of the snowbank to hollow it out. Make sure you don’t scrape away too much snow from the roof or walls, otherwise your fort might collapse!
- Once the inside is as large as you want it to be, poke a few holes in the top of the roof to help air circulate.
- Crawl inside and enjoy!
Option 2: Make an Igloo
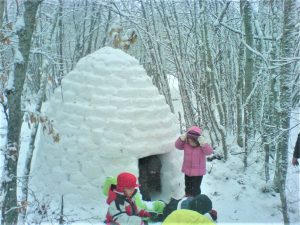 An igloo is stronger than a quinzee, because it’s built out of blocks rather than loose snow. But it takes a lot more work to make.
Materials
- Lots of snow
- A shovel
- A plastic container (square or rectangle shapes work best, but any shape will do)
Steps
- Decide how big you want your fort to be by drawing an outline of it in the snow. Don’t forget to leave a gap for the entrance.
- Take some snow and pack it into your container. Make sure it’s squished down nice and tight, and it’s filled up to the brim! You can even use the snow inside the outline to pack your containers.
- Flip the container upside down on top of your outline, and give the bottom a few taps to help unstick the snow from the container walls.
- Lift the container up, and it should leave behind a lovely little brick shape.
- Repeat steps 2 – 4 until there’s a line of bricks all along the outline. Then, start stacking new bricks on top! Keep doing that until the walls are as tall as you want them to be.
- To make a roof, slowly start adding bricks that are slightly off-center, with a small part of the brick hanging off the edge of the one below it. Keep doing this until the dome is completely closed.
- Add small holes or slits in your finished igloo to help air circulate.
- Crawl inside and enjoy!
Tips
- It’s easiest to build snow shelters with slightly wet snow - the same type of snow you use to make snowballs or snowpeople. This snow sticks just together a bit better. If you want to make your own sticky snow, just add a tiny bit of cold water to it. But be careful! Adding water that’s too warm will melt your fort!
More things to try!
- Just how much warmer is your snow shelter? To test this out, put one thermometer inside your fort and one thermometer outside. See how the temperature changes throughout the day. You can even record how the temperature changes in different weather. How warm is it inside your snow fort when the weather outside is – 100C, -200C, or -300C?
- If your fort is big enough, try building small little snow piles inside that you can lie down on. Since colder air usually sinks, the top of the snow piles inside the shelter should be warmer than the floor of the shelter. And they make the perfect place to lay back and admire your hard work!
- Try decorating the shelter with coloured water! Take some food colouring and add it to a spray bottle filled with water. Give it a quick shake to help mix it all together, and then start spraying your fort! But be careful that the water isn’t too warm, otherwise it will melt your fort.